Tuesday, 28 May 2013

LIFESTYLE COURSE - MORE LEARNER'S WORK, SHOWCASING THE JEWELLERY AND CONGRATULATIONS!

The learners have been very busy lately, pushing their skills to produce some excellent finished designs.

Tracey
Sandra

Lyn
 Inspired by another maker, the lovely Jane Riddiford, the students asked to learn how to make wire wrapped rings last week. These first attempts are fantastic and they have managed to make the designs in their own individual styles.

Julie

Steph

Tracy
Carolyn
Lyn is a talented beader and she showed me how to make this lovely peyote stitch ring. It's a technique I've never tried and thanks to Lyn, I now feel ready to have a  go!
 Some of the ladies from the lifestyle course and previous, accredited course joined me at a local fair last week, showcasing their work and making sales :) A lovely day was had by all and I was blown away by the quality of their work.
From left: Steph, Sue, Lyn & Julie  
Shown here is a selection of the beautiful work of Sue who specializes in occasion jewellery and even makes stunning wedding gowns!
A selection of work

Finally, congratulations to all 10 students from the accredited course wh received their certificates last week. I am so very proud of them (and me!) for all their hard work.
WELL DONE GUYS XXXXXXXXXX


Wednesday, 15 May 2013

LIFESTYLE COURSE - Learner's work

As we start week 6 of a 10 week lifestyle jewellery-making course at Bedwas Adult Education Centre, I wanted to share some of the work done so far.
Everyone was keen to try wire wrapping and so we've concentrated on this for the last few sessions, having a go at various techniques. The class is a mixture of abilities and skill levels but all have made some great designs. All apart from one learner has attended my workshops and/or courses before and I've chosen some repeat designs for them to tackle as well as new ones. Several people in the group attend glass making classes with other tutors at the centre and have incorporated their own lovely pieces into the designs.
Lyn 

Lyn recently completed the accredited course with me and is a regular workshop attendee at various classes in Bedwas Centre

Tracy also took the accredited course with me and enjoys the design element of the making

Steph

Steph too completed the accredited course and has done several workshops with me at both BAEC and Y GALERI


Ken is new to my classes but is a regular at the glass making  ones in BAEC and other workshops
 Tracy
Tracy

Lyn

 Steph
 Steph


Lyn, Steph and fellow students Julie and Sue, will be joining me at a craft event 

Sunday 19th May at Bedwas Workman's Hall, 11am-3pm. 

A selection of their work will be available to purchase, as will some of my own designs created using glass pendants made by Ann Jones, art and glass tutor at

 Bedwas Adult Education Centre.


Thursday, 2 May 2013

Making Jewellery Magazine Issue 54 - Chilichic Tutorial

Once again I am lucky enough to have  a tutorial included in my favourite jewellery-making magazine, Making Jewellery. 
June's issue 54 includes an array of designs created within the theme of 'Decades'.


INSPIRATION

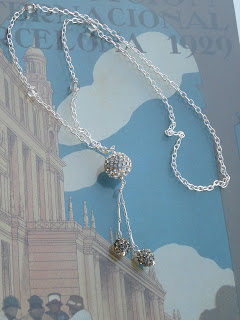
I've had a fascination with the 1920's since my art college days and couldn't resist tackling a dramatic necklace style, associated with that time.
'Sautoirs' were originally from around the early part of the 19th Century but became popular from the early 1900's and are now usually associated with the 'flapper' style of the Art Deco era.
 Features of a  'Sautoir' necklace generally dictate it should be an extremely long and substantial design, culminating in a tassel that may also be removable. The extreme length of the design is to allow it to be draped down the back (think elegant backless dress) or looped at the neck. An extra tassel or feature may also be added at the back. There are fantastic examples of elaborate, beadwork pieces that are quite beautiful.

My inspiration for choosing this piece was an old beaded item (a belt I think, but I wear it as a necklace!) gifted to me by a dear friend. I believe it belonged to her grandmother or aunt and though I am unsure of its actual date or origin, it is one of the nicest items I own and was the starting point for my own design.
Original Jewellery
Chilichic Design

I decided not to use traditional beadwork for this project, instead incorporating some basic wire work by creating loops either side of glass bugle beads and threading them on clear monofilament. Though still long, I opted to keep the length shorter than a sautoir would be, simply to make the piece more wearable. I did use the idea of panels, interspersed with tiny, clear seed beads and re-created 
the 'chain' loop effect for the top section. 
The tassel was made using both the seed and bugle beads and is attached with a small bolt clasp. 
My idea was for there to be an option of detaching it and the necklace can be switched around so the wire and bead section hangs at the front.

I had several ideas for this project and so for the extra pieces required for the Making Jewellery tutorial, I went for a similar style but using gold and a really simple but effective tassel design using crystal beads and chain.


I like jewellery that has movement and many if my Chilichic designs update these ideas to contemporary pieces, featuring detachable pendants and charms. I love the idea of altering the look quickly and having versatility to a piece of jewellery, these may be my favourite style of necklace.

Follow Chilichic Jewellery on Facebook or join me on Twitter .
Making Jewellery Magazine on Facebook.

Wednesday, 20 March 2013

Creative Craft Skills: Jewellery - Final Learner Designs

Well, we made it to the end of our 8 week accredited course and a massive thank you to all the learners who hung in there and did some great work. 
We will have a little while to wait for certificates but I'm confident everyone has covered the necessary criteria required to achieve the learning outcomes:

  1. Demonstrate an understanding of health and safety requirements to undertake creative activity
  2. Develop ideas for creative activity
  3. Experiment with media using a sketchbook and/or journal
  4. Understand the importance of planning for activity
  5. Explore and use materials and equipment within given context
  6. Explore and use techniques to undertake activity within given contexts.
Each learner's work was required to meet the necessary assessment criteria and they were asked to show evidence of carrying out all of the following:
  • Identify and agree to studio/work room safety rules
  • Use materials and equipment safely
  • Identify a range of sources (at least three) for ideas
  • State how these might be used in creative activity
  • Use a  sketchbook and/or journal to record exploration of ideas.
  • Give own response to the development of ideas
  • Identify each stage of the activity
  • For each stage, state the tasks and list the materials required
  • Identify any problems at each stage and state how work is modified as it progresses
  • Identify materials/equipment needed for chosen activity
  • State how these will be used
  • Experiment with those selected and state possibilities and constraints
  • Use basic techniques to execute activity
  • Experiment with techniques and identify possibilities and constraints
Phew, lots of work and at the outset, all 10 learners had varying skills, from complete beginners with no prior experience of attending an adult course, to regular makers that have achieved accreditation in other subjects, and were familiar with the process. It was also my first time teaching an accredited course and  if I were to teach this again I would certainly change some areas of my assessment evidence but I am very pleased with the work produced as everyone now understands the design process, the importance of planning a task as well as knowing what the tools do and which materials to use them with. Everyone started with a  basic kit and the results are very different. Each did indeed experiment with the tools, materials and techniques and felt confident in identifying constraints and how to research possibilities to execute the activity successfully. 

Well done all and I'll see some of you soon on the next  course!         

Sue incorporated spirals
effectively throughout her design
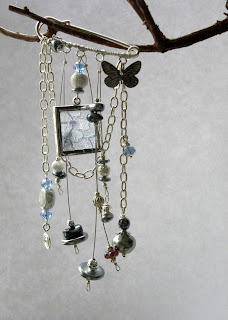
Steph chose a piece of lace for her mixed media,
adding a  pretty metal butterfly for extra detail


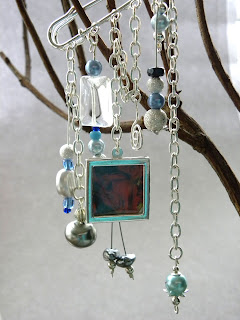
Annette combined crystal beads and
a  family photo to personalize her  piece
Julie used pastel coloured beads and
feature details to individualize her brooch


Lyn introduced red beads and a cameo to
create a  vibrant design
Pat utilized chain to attach her main bead drops in an asymmetrical style


Sandra used her VW photo as inspiration,
 bringing colour and quirkiness to the design
Tracy embellished her beads and used a snowflake design creatively for her sumptuous piece


For Corinne, it had to be green! Her image was
chosen to make her smile :)
Nic chose complementary lilacs to enhance the design, adding a pretty crystal heart